http://www.cocomy.net/post/619829
前任 珠海學院工商管理學系 系主任 (1996-2006),以真實身份亮相,目的是希望藉著網絡之威力,將我的換腎後生活狀況及其後遺症狀,傳予失去連絡的舊友、學生及腎友分享!
2018年2月19日 星期一
3 Minutes Before Sleep: Simple Exercises to Slim Down Your Legs
3 Minutes Before Sleep: Simple Exercises to Slim Down Your Legs
Fitness coaches say that the most important thing about working out is persistence. However, let’s be honest with ourselves: daily exercise is not the most exciting thing to do.
It’s easier to strive for the perfect shapes with due diligence if you know that your exercises won’t take a lot of time.
A short set developed by the famous American celebrity coach Tracy Anderson helps to eliminate “fat deposits” on the knees and hips that can appear even in slender people. Let’s work out the front, back, and inner thigh surface and get thinner with the help of short exercises.
Don’t forget about the bonus at the end of the article: how to make your legs feel less tired and puffy.
What to do to make your legs slender
- Workout place: a bed.
- Workout duration: 3 minutes.
- When to work out: after you wake up or before going to bed at night.
- Frequency: every day.
1. Toning the front part of the thighs
Works and tones the front part of the thighs, knees, and abs.
The initial position: Lying on your back, arms down on both sides of the body. Raise your legs so that they make a 90-degree angle with your body. Don’t bend your knees. Pull your toes up. Bend your knees one by one, and return your legs to the initial position. Keep your knees together, and keep the front part of your thighs tensed.
Repeat: 10 times for each leg.
Self-check if you’re doing it right: Feeling hot in your muscles.
Important: In the initial position, your knees should be as straight as possible.
2. Toning the back part of the thighs
Works and tones the front and back part of the thighs, knees, and abs.
This exercise consists of 2 parts.
The first part: The initial position — lying on your back, legs raised, toes pulled toward your body. Hold your knees together, and bend your knees one by one. Important: your toes should always be pulled toward your body, and your heels should reach your buttocks.
Repeat: 10 times for each leg.
The second part: The initial position — lying on your back, legs raised and a little bit bent at the knees. Make swings with both legs, raising your buttocks and keeping the upper part of your legs tensed.
Repeat: 20 times.
Self-check if you’re doing it right: Feeling the tension in the muscles of the back part of your thighs and feeling a slight burning.
3. Toning the inner part of the thighs
Works and tones the upper part of the legs, buttocks, and abs.
The initial position: Lying on your back, keeping your legs raised and crossed with your right leg over your left leg. Both legs are tensed and pressed against each other. Bend your knees toward the sides to make a “plié” movement, and then return to the initial position.
Important: Your legs should always be tensed and pressed against each other.
Repeat: 10 times with your right leg in the upper position and 10 times with your left leg in the upper position.
Self-check if you’re doing it right: Feeling leg pressure, knees control.
Bonus
One of the biggest advantages of this set of exercises is that it can be very useful for those who suffer from swollen legs and varices.
But there is a way to get rid of swelling, pain, and the feeling of tiredness in the legs if those are caused not by a disease but by an unhealthy mode of living, such as sedentary work, the wrong shoes, or a lack of physical activity.
Specialists suggest 3 simple rules:
- Walking. It might seem strange, but the more you walk the less your legs swell and become painful. The most important condition is comfortable footwear. An optimal amount of walking is 30-60 minutes 3 times a week. In order to speed up blood flow, walk for 10 minutes every 2 hours.
- Exercise for the ankles. Every time you remember this, bend your ankles for 20-30 times, pulling your toes toward and away from your body. This exercise improves blood circulation and helps to remove excess liquid.
- If you like fitness, go for swimming or water aerobics. “Struggling” against water pressure helps to improve water and blood flow in the limbs.
What do you think about these methods of improving the health of your legs? Share your opinion with us in the comments.
Preview photo credit depositphotos.com
Illustrated by Daniil Shubin for BrightSide.me
Illustrated by Daniil Shubin for BrightSide.me
全 Data 自救手冊 2016
全 Data 自救手冊 2016
相信不少 wire 民都經歷過壞卡的慘痛經歷,不論是相機內的 SD Card 或者是手機內的 Micro SD,都有機會因種種問題意外損壞。筆者當然亦有不少壞卡的經驗,以下就由淺入深同大家分享一下解決方法,希望可幫你救到 Card 內珍貴的相片。SD Card 出問題,我們最常的做法是把它插至電腦進行修復及拯救工作,以下逐步講講:
若插咭後成功看到 SD Card ..
確認是否 Card Reader 出問題
拿出相機 SD Card 後插至 SD Card 入電腦,如果發覺出現認不到,先不要恐慌,這時的 SD Card 未必出事,而出事的有機會只是 Card Reader。此時應該安全退出 SD Card,然後找別的 Card Reader 再作嘗試,最理想是找部內置有 Card Reader 功能的 Notebook 試試,它的辨認能力會比 USB Card Reader 或者機箱 Card Reader 好。
讀寫有問題 – 用 Windows 內置檢查功能
如果各位 unwire.hk 讀者的 Card Reader 沒有問題,但仍出現 SD Card 讀寫問題,例如只出現磁碟 Label 無法進入,此時可嘗試使用 Windows 內置的檢查工作進行偵錯及修復。

▲ Windows 的工具好簡單,先右鍵磁碟然後按「內容」。
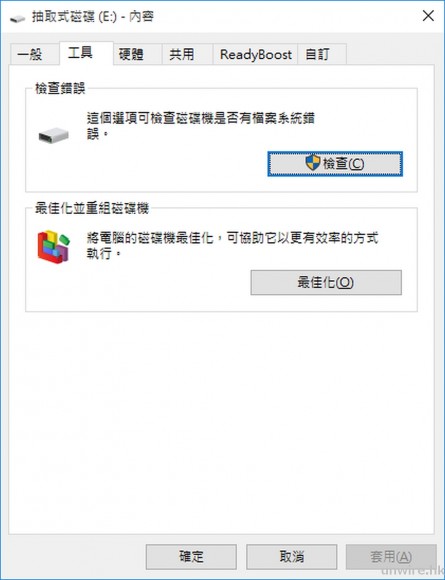
▲在入面切換至「工具」頁,進行檢查錯誤就可。
若插卡後沒反應..
用 Windows 內置磁碟工具
有些罕見的情況,就是 SD Card 插入後卻因沒有配置磁碟 Label 而沒有顯示出來,被錯誤認為 SD Card 死掉。其實這情況的 SD Card 沒有問題,只需要用磁碟工具配上 Label 就可如常使用。有時有些新買的硬碟,也需要運用到這個小技巧。
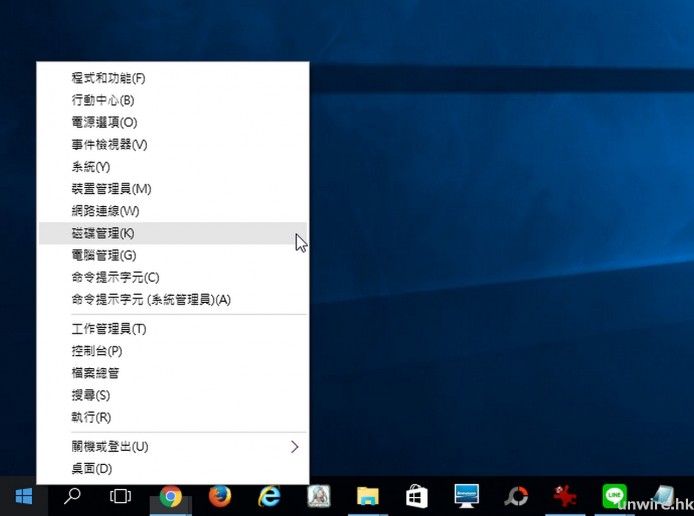
▲要打開磁碟工具,最快的方法是右鍵 Start Menu 然後選擇「磁碟管理」。
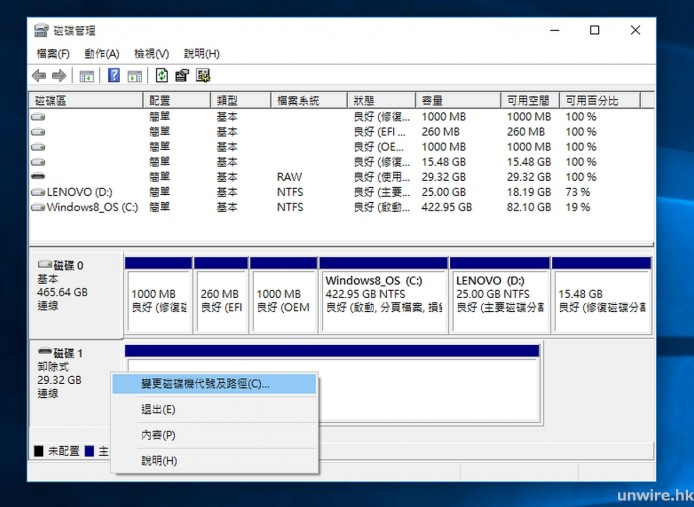
▲在內可根據「卸除式」及容量辨認到 SD Card 裝置,右鍵它並選擇「變更磁碟機代號及路徑」。
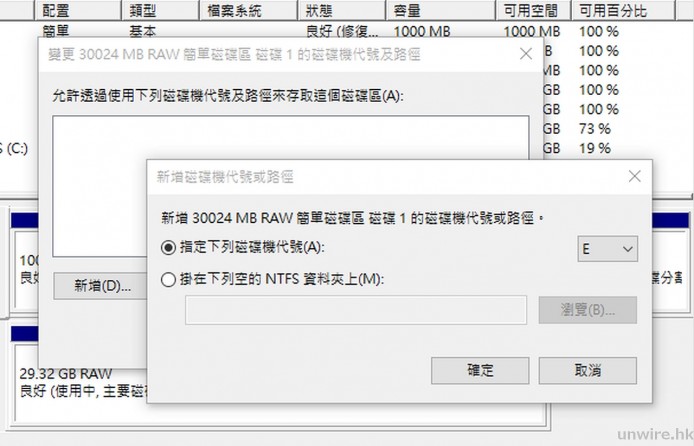
▲隨便為它加上一個磁碟機 Label,例如 E: / F: 就可以了。
沒辦法下的 Format 後救 File
插入電腦後出現需要格式化的視窗,也是我們不時會遇到的情況。如果做了上面的步驟也仍然無補於是,仍然彈出格式化視窗,我們可以考慮把它送往維修中心 (下面會提及),或者索性真的格式化。因為之後的修復步驟,就算 SD Card 格式化了我們仍可救回相片。要注意的是格式化時必需要選擇「快速格式化」,而且在格式化完後就立即進行以下的修復,不要在 SD Card 放入任何檔案。
救 Data 篇
令 SD Card 成功在電腦辨認,但在偵錯過後相片依然無法存取,或者是意外刪除了,此時就要使用一些修復軟件進行恢復工作。留意恢復工作是非常耗時,往往要數十分鐘~數小時甚至更多,依照片數量而定。
各種電腦軟件修復消失/亂碼相片
簡單好用成功率高 – Digital Image Recovery
艾露貓曾經試過多次死卡,並使用了不少修復軟件。當中最為推薦的反而是一個陳年舊軟件 – Digital Image Recovery,在別的軟件都失敗的時候,它卻能有不錯的成功率,成功為小編救回不少相片。Digital Image Recovery 現時已經停止開發,但仍可在重灌狂人的網站下載得到,建議 Keep 住此軟件永久保存。
下載地址:
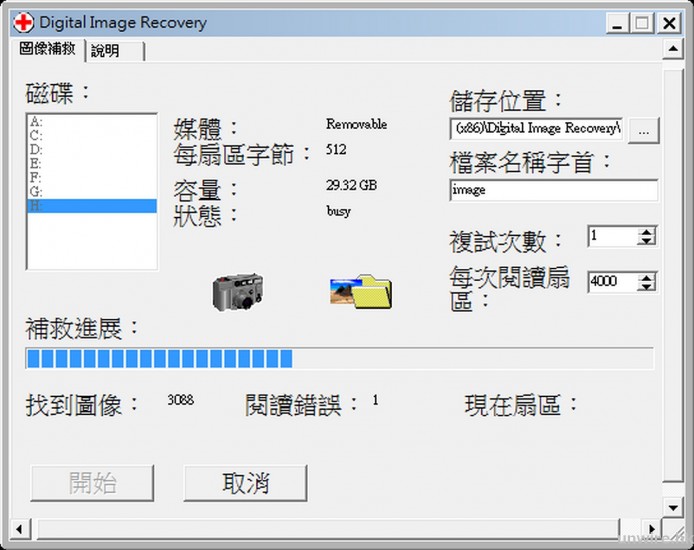
▲Digital Image Recovery 使用超簡單,打開後選擇 SD Card 及儲存位置就可開始。
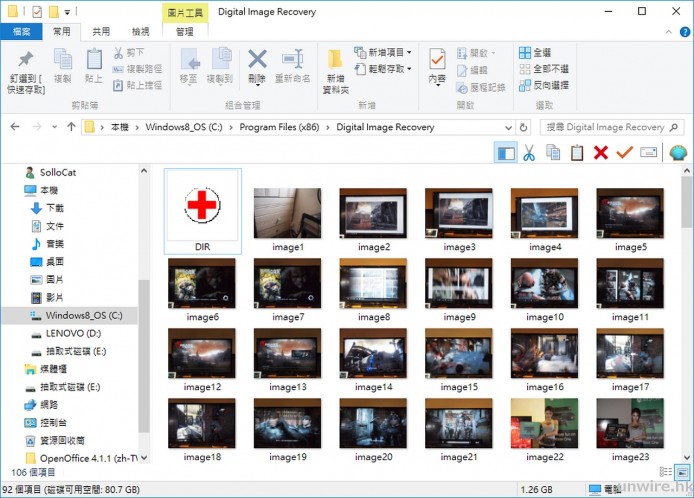
▲軟件會把卡內所有相片,包括受損/刪除了/亂碼等的都挖出來,很有機會找回遺失相片。
影片及 RAW 多格式修復 – ZAR X
另一個艾露貓推薦的軟件是 ZAR X,長寫是 Zero Assumption Recovery X。它的獨特之處是支援比 Digital Image Recovery 更多的格式,包括影片的 MOV、AVI 以及 RAW 的 CRW、CR2、ORF 等等。ZAR X 是免費使用,不過拯救率個人感覺會比 Digital Image Recovery 低。
下載地址:
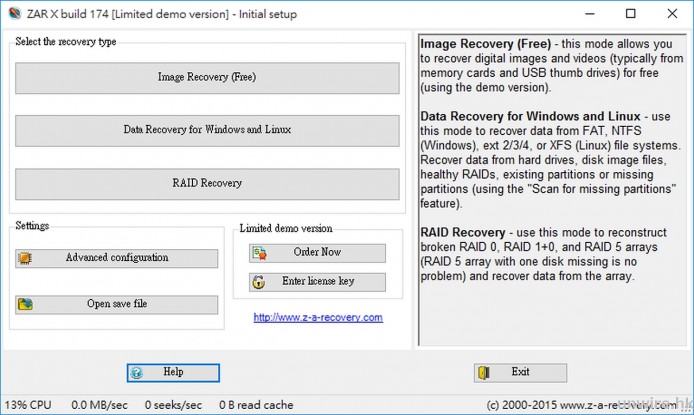
▲打開 ZAR X 後選擇 Image Recovery (Free)。
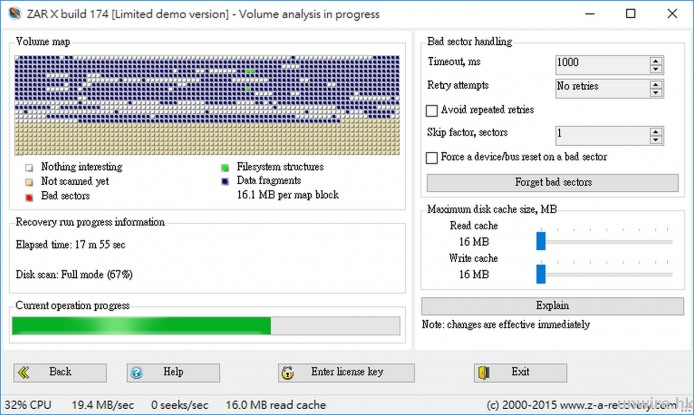
▲之後就可選擇 SD Card 位置,然後進行修復工作,此步驟會自動進行。
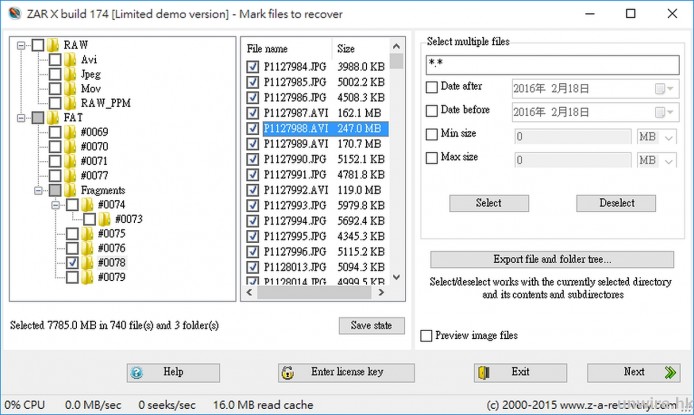
▲完成掃瞄後可選擇檔案進行恢復,可需要可全部勾選起來。之後設定一個輸出路徑就可輸出結果。
免費有深層掃瞄 – RECUVA
修復軟件各位 unwire.hk 讀者應該不會嫌多,能救到檔案就可。這個 RECUVA 亦是另一個好用的修復軟件,它是磁碟清理軟件 CCleaner 團隊的另一個得力作品,介面簡單直觀之餘,效能也是相當不錯,免費版本已經有深層掃瞄功能,而且也支援多種格式檔案。
下載地址:
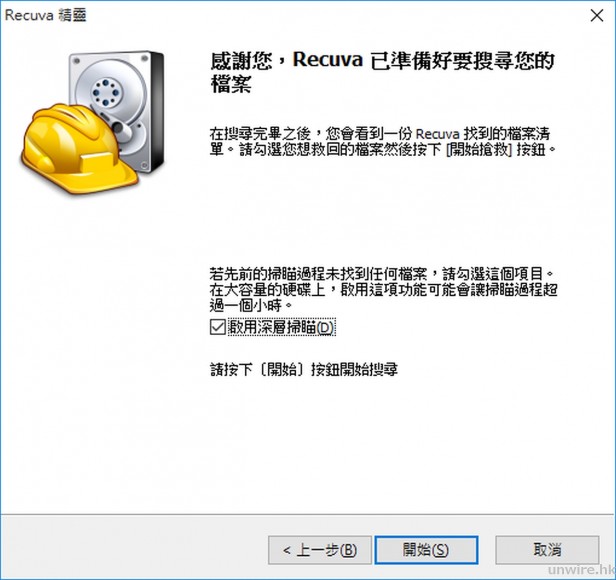
▲打開軟件後可選深層掃瞄。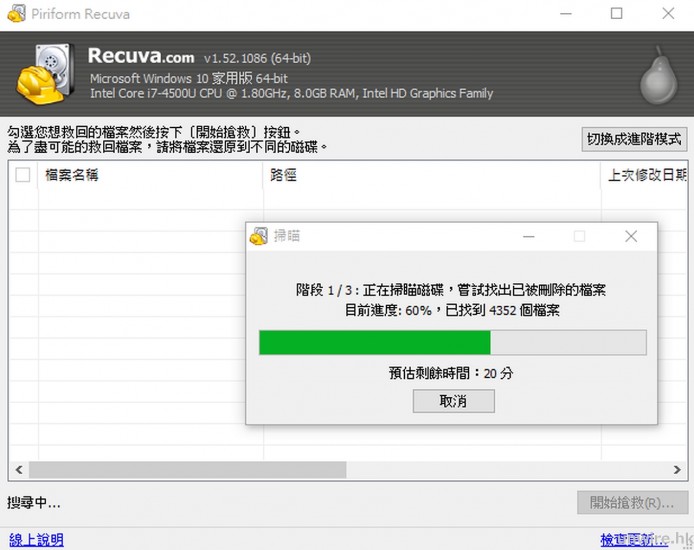

▲深層掃瞄非常耗時,筆者格式化了的 SD Card 也需 1 個多小時。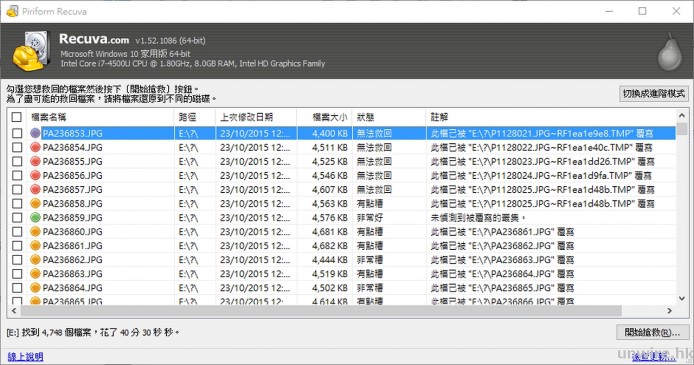

▲RECUVA 的優點是可清楚看到相片恢復的成功率,紅色表明「無法救回」。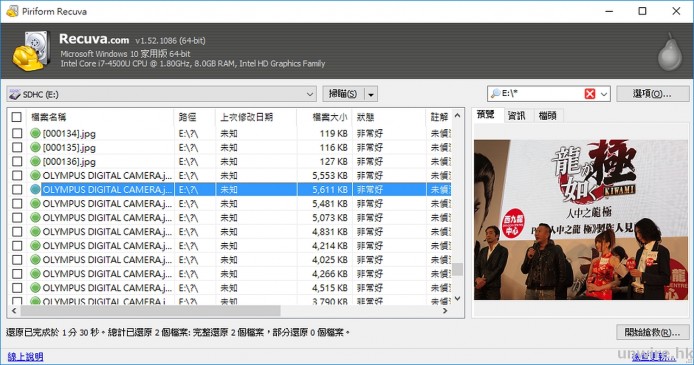

▲打開進階模式的話,對一些綠色成功率高的相片也可以得到預覽。選好相片後按「開始搶救」就可,注意搶救時間亦都相當費時。
終極方案 – 交給數據恢復中心
如果以上的方法都無法修復 SD Card 內的相片,這個時候就難以再進行自救,而要尋找其他協助了。香港有多個數據修復的中心,除了 Harddisk 以外也有提供 SD Card 的修復。雖然他們都是不成功不收費,但這些數據修復的服務普遍都很貴,要有花上千元甚至數千元的心理準備,確實的價錢需要檢查及報價來決定。
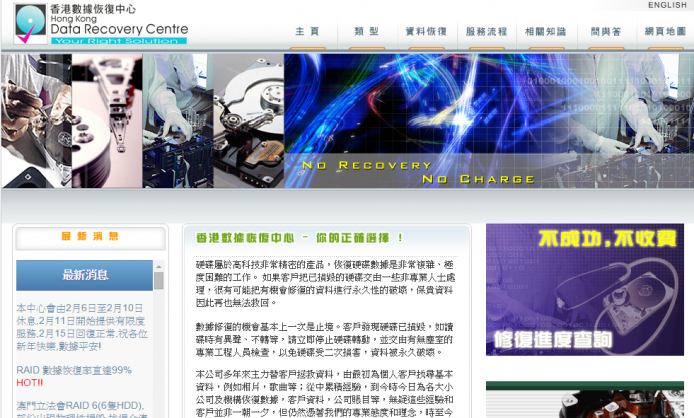
香港數據恢復中心
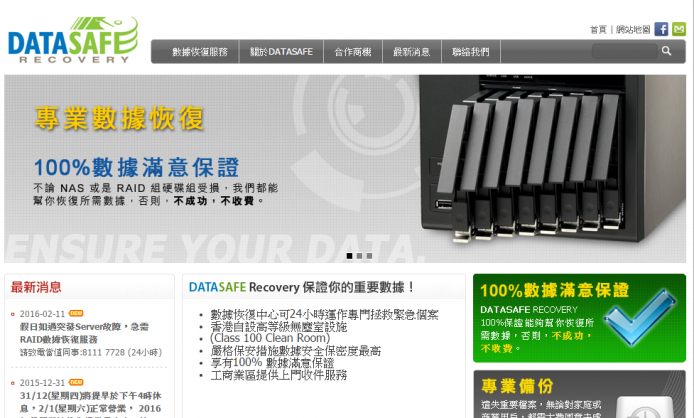
Data Safe Recovery
預防遺失資料篇
要預防失去重要相片,最好的方法就是不時備份,以及妥善使用讀取裝置。而手機的話自動備份將是一個良好方案。
使用自動備份,手機多點連接 Wi-Fi
現時 Google Photos 有提供手機的自動備份功能,拍攝後相片都能自動上傳至 Google Photos,而且一般高質素相片有無限容量,用戶只需多點連接 Wi-Fi 讓它上傳就可。電腦的話亦有提供桌面版上傳工具,指定路徑就可自動備份上網,非常方便。
使用新的 Card Reader 前需要提防
購買一個新的 Card Reader 想使用時,有機會因 Card Reader 品質,或者插錯 Slot 又出現 Data 損毀的問題,使用新的 Card Reader 前要特別小心。如果 Card 內有重要相片未備份,還是先用回舊有可行的最安全。
接觸不良時避免胡亂抽插
Card Reader 認不到 Card 時,有些人會習慣直接在卡槽抽出再插入,這樣做其實也有機會令 Data 損毀,應盡可能駁掉 USB 才再插入 SD Card,然後再插回 USB。
• 要入手生活科技潮物 即上 unwire store
https://store.unwire.hk/
標籤:
冷知識
訂閱:
意見 (Atom)


